Tampilkan postingan dengan label art. Tampilkan semua postingan

Have you met SUPER E??? {CVCe Words}

This week I introduced my students to SUPER E! Let's just say that they are CrAzY about him now! When I hung up their artwork in the hallway, they were so bummed that I wouldn't let them take them home the same day. One little boy said, "But Mrs. Erickson, how will I teach my mom about him if I can't take him home?" Sweet boy! Don't worry, I'll let them take their creations home soon! But for now, they are staying at school while we continue to learn about how awesome SUPER E is.


We haven't gotten through all the practice pages available in my CVCe Packet yet, but in all the pages we have done, SUPER E has made an appearance and he's kind of a big deal... :)


Last year, when I first posted about this unit, some great readers told me about this awesome YouTube video by Mark D. Pencil. Ummmm... WOW! It goes PERFECTLY with this CVCe Packet! My students beg me everyday to let them watch it again!!! {Have I told you lately how much they love SUPER E????}


Next week I am going to show my students the Word Caper. It is a great little Leap Frog video about adding silent E to the end of words.  Check it out for yourself {here}!


This Unit Includes: CVCe SUPER E posters {color, b&w, and draw-your-own}, a CVCe lesson suggestion with an accompanying worksheet, an original CVCe story with SUPER E as the main character {in color and b&w} with an accompanying worksheet, a SUPER E craftivity that your students will love {pictured above}, CVCe game {easy prep. work}, and 2 practices pages. 


Click {here} to check it out this unit for yourself!

How do you teach your students about CVCe words?

reading goal craftivity!

First off... WOW! Thank you to everyone who added their top 5 pictures books to the Must Have Picture Books linky!!  You guys are AWESOME {even though I have a HUGE wishlist that just might break the bank}! 

Speaking of books {Did I mention I love books?}, I have converted my Summer Reading Survival Guide into a "generic" school year craft. This craft is very similar to my Summer Reading Survival Guide, but it doesn't include a parent letter or reading chart, it is JUST the craft {which is why it is only $3.00}. This craft comes with 5 different book choices that say: My Kindergarten Grade Reading Goal, My First Grade Reading Goal, My Second Grade Reading Goal, My Third Grade Reading Goal, My Fourth Grade Reading Goal and My School Year Reading Goal.  The writing portion also comes with and without handwriting lines, so you can adapt it to your classroom needs. 


In my classroom, we will be making this craft the first week of school, so my students will know how important it is to read each night.  I MAKE IT A BIG DEAL!!! {I will also teach them about the reading beads they can earn.} Then, I will send this craft home with my students so they can put their goal somewhere special at home!


How do you encourage your students to read, at home, during the school year?

all about biographies!

In my second grade classroom, we are all about biographies! {Confession: I think most biographies are quite boring... but of course I would never tell my students that... and even if I did, they wouldn't believe me. They think biographies are pretty much the coolest thing ever. EVER.}

To make biographies "cool" I started out by telling my students all about them, using these posters. 
{Okay, so this part isn't really that cool... but at least the posters are cute!}

And then I pulled out all the awesome biographies {Harry Potter anyone??} and my students have been smitten ever since. They LOVE learning about different people-- esp. famous people they watch on TV.


Then I showed them what their own autobiographies were going to look like and they got excited! But before I let them start, I gave them the "you-better-do-your-very-best-work" talk, because this is going to be the final project that I will send home with them at the end of the year. We are talking keepsakes that their parents will keep forever and show their future boyfriends/girlfriends keepsakes. {You gotta have something to show for second grade, right?}


In case you were wondering, this is what I really look like:


Here is a little peek of the inside of the books:


We aren't nearly finished with our autobiographies, but we have a good start and they are already really proud of what they have done so far. I am excited to see their final products and I will def. post pictures!


If you want to make your own autobiography books with your own students 
{to send home as an end-of-the year keepsake}, you can purchase it on TpT for $8.00. {Click Here!

This unit is perfect for 1st, 2nd, & 3rd grade and it includes: biography poster, autobiography poster, 2 worksheets/assessments to accompany both posters, autobiography activity {with all the pages needed to complete a book and an art activity}, and a homework assignment to help write autobiographies.


The first person to comment will get this unit free!
Don't forget your email address!

you are worth more than gold!

Hello, Sweet Friends! I bet you all thought I dropped of the face of the planet, huh? I have been spending a lot of time with my family lately {and shopping and stuff}. In my pathetic attempt to have a life, I have been trying to balance my work life and my REAL life. I am enjoying a much needed break and it feels SO good. 

I was going to create a St. Patrick's Day unit, but I just don't have it in me. 
However, I did start something and since I don't want it to go to waste, you get it for FREE!
{I owe a HUGE thanks to my big sister for the idea! Love you!}

This fun, free activity will get your students excited about St. Patrick's Day, while
 thinking about those they love {more than gold, of course}!


Click the image below to get this free download:

And... what would March be without rainbows??! 
BTW: I owe a big shout-out to my room mom for painting with my second graders...  


I hope you can use my free download in your classrooms! 
-xoxo-

predicting {this one's for the BOYS!}


Hello Friends! Happy Monday... {is there such a thing???}

Today we talked a whole lot about predicting... and the SUPER Bowl! Since I am a total girly girl and I know
N-O-T-H-I-N-G about football, I had to recruit my husband and some of my students to help me on this one. I'm sure you have seen this adorable football {can those two words be together?} craft created by the talented Teri at A Cupcake for the Teacher. When I first saw this craft, I knew I had to make it with my students... 
{and I didn't even know who was playing... who cares, right??!}

You can purchase the craft pattern from Teri's TpT and TN stores for only $1.00!


My boys got really into this activity! Finally... a craft they could relate to!


I had one little boy who pretty much convinced the whole class that the New England Patriots were going to be the winning team... he gave lots of good reasons... and since I don't know that much, I believed him.


Thanks, Teri, for such an awesome idea!! {If you haven't checked out her blog, you need to!}


How do you teach predicting to your students?

teacher tip: permanent markers & whiteboards


Hello sweet friends! I hope you are having a good week. :)

I wanted to share a little tip I learned from a friend that involves a permanent marker and whiteboard.

You are probably wondering what these two things have in common... because who in their right mind would use a permanent marker on a whiteboard...

Well, I am sure it occasionally happens by accident or, if you are like me, then you did it on purpose.  I used permanent marker on a small whiteboard I used for taking lunch count/roll. I drew lines on it to section off the different lunch choices. However, now that I am half way through the school year, I want to use my little whiteboard for something different {a place to put spelling words for the week}. 

Thank goodness for my BFF teacher friend for showing me this awesome trick:
Yay! Now I have a place to put the magnetic spelling words and I didn't have to buy a new whiteboard!

--------------------------------------------------------------------------------

I also had to show you our darling January artwork {which I am displaying on my magnetic art wall}. 
To see where this inspiration came from, click here.


Not only is this artwork super beautiful and lovely to look at, but my students really enjoyed themselves!

What fun things do you do during January?

Do you have any fun teacher tips that will make life easier?? {Please share!}

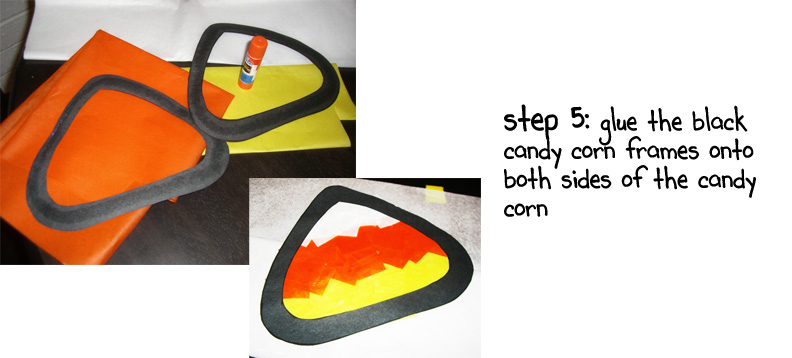
tutorial: candy corn art

I am so excited for October, because Halloween might be one of my favorite holidays (besides my birthday)!
Last year we made this darling candy corn art (thanks to my wonderful teacher friend) and it hung from our ceiling during October. My students had a lot of fun making these and they turned out super cute!


Click here to download the Wax Paper Candy Corn black line.
Click here to download the Construction Paper Candy Corn black line.

ENjOY!!

DIY magnetic art wall

Last year I had a "cursed" wall. I wish I took a picture of it for you, because it really was cursed.
It was ugly, damaged, and I couldn't staple a thing into it. I covered it with butcher paper (by taping and gluing it down) and used it as my art wall anyways. I struggled all year long to get artwork to stay up... because, sometimes you just gotta work with what you have.

This year I wasn't willing to deal with that wall. No way. Instead, I covered it up with sheet metal.
It was my sister's idea. She is a genius!!!
I got the sheet metal from a local heating and air conditioning company.
They were so nice and they cut it so it would fit my wall perfectly.
  
The best part: It only cost me $35.00.

It was wayyyy cheaper than a home improvement store... 
Don't you wish those places offered teacher discounts?


I didn't have to use a drill to get the sheet metal to stay up, instead I used double sided Duck Tape
By the way, that stuff is pretty much amazing and knocks the socks off of Teacher Tape.
And to keep the black polka-dotted boarder up, I used glue dots and so far it has worked like a charm!


Don't you love that adorable banner? My sweet mom helped me cut out all that felt and then she sewed it together for me. I'm lucky to have such a talented mama (and sisters).


I love my new wall! Now I use magnets with my students' names on them to hold their artwork.
My students think that magnets are pretty cool, too. They love putting up their own art.
For my magnets, I used a similiar idea to Mrs. Rojas over at Create, Teach, Inspire
and they turned out darling!

How do you display your students' artwork?

mrs. potato head | free download |

It is "technically" spring.

Will someone please tell the weather man?

Today we had to have indoor recess due to the snow storm...

I don't like indoor recess.  I don't like snow.

Not. One. Little. Bit.

Maybe if I start planning my spring units, then spring will come?

Maybe...

Last year, when I was a student teacher, I made these with my class:

To plant the grass in pantyhose, you can follow the directions I found here.

Instead of decorating the pantyhose, I decided it would be easier to decorate a clear, plastic cup.

This free download is no longer available! Sorry! :(

mini leprechaun hats

The day before St. Patrick's day, we are going to make leprechaun hats.
But not hats for us--hats for the actual, REAL leprechauns.

To make the hats, we will decorate a Styrofoam cups with markers. 
 Then we will leave them on our desks for the leprechauns.


While the kids are away from school, the leprechauns will visit.
They will "magically" shrink the hats so they will fit even the tiniest of leprechauns.


When the students return to school, this is what will be on their desks:


Your students will think it is magical!

---------------------------------------------------------

So now you are probably wondering how to shrink the hats, huh?

Well, it's easy! All you need is an oven (I will be taking mine home) and a little magic.

Step One: Preheat the oven to 400 degrees (Fahrenheit).
Step Two: Place 3 or 4 Styrofoam cups upside down on a cookie sheet.
Be sure to leave plenty of space between each cup.
Step Three: Put the cookie sheet in the center of the oven.
Step Four: Keep a close eye on the cups while they shrink. This part is super cool!
Step Five: Take them out after a minute or so (when they stop moving).

Here is a before and after shot of the Styrofoam cups: 

And to finish it off, all you need are the Keebler E.L. Fudge Cookies!
(Which are perfect, because they stand on their own!)


What fun activities do you do on St. Patrick's Day?
Older Post ►
 

Copyright 2011 the teacher wife is proudly powered by blogger.com